How to Migrate a Wor...
How to Migrate a WordPress Website to a New Host

How to Migrate a WordPress Website to a New Host
Thinking of switching your website to a new host due to slow website loading speed? Well, it can be a cumbersome task, especially if this is your first time. Losing your website data and experiencing website downtime are two of the biggest risks involved. Not only would it take time to recover the valuable information but also result in lower search engine rankings.
In this tutorial, we’ll help you understand how to migrate a WordPress website to a new host in a step-by-step guide. Let’s begin!
Step 1: Choose a new WordPress web host
Choosing a new WordPress web host need not be a daunting task, however, it can be confusing with several web hosts available today.
Research well about your needs before narrowing down a web host:
- If you’re a new website with less traffic, then we recommend Shared Hosting. It is affordable and you can scale depending on your growing traffic
- If your website had moderate to high traffic then we recommend you opt for Cloud Hosting
- If you are looking for simple and easy management we recommend, WordPress Hosting
Once the choice of which type of hosting you want to opt for is made, you need to decide a web hosting provider. One of the key things to keep in mind are the problems you’re facing in your present web host and see if your new web host offers the right solution.
Quick Tip: Read reviews on hosting websites and call the support/sales of the new web host to ask your queries. If you believe, they offer good support, as well as, satisfy your website requirements then you can go ahead with your choice of host.
Step 2: Install and Setup the Plugin
After you’ve transferred your WordPress website to the new web host you need to install a plugin. Make sure that you do not install WordPress just yet.
There are several plugins available. Some of them are:
- Duplicator
- UpdraftPlus WordPress Backup Plugin
- All-In-One WordPress Migration
- WP Migrate DB
- VaultPress
- BackupBuddy
We recommend the Duplicator plugin as it is simple and easy to use. It is a free plugin that can help you transfer your website with ease.
If you’re a beginner, do check out our step-by-step guide on how to install WordPress plugins.
To install the plugin click on ‘Add Plugins’ in your WordPress dashboard and search for ‘Duplicator’. Once you find it, click on ‘Install Now’ and activate the plugin.

Post installing and activating the Duplicator plugin, go to your WordPress admin area.
Here, click on ‘Packages’ nestled under the Duplicator plugin. Next, click the ‘Create New’ button in the top right corner.

After clicking on ‘Create New’ a new dialogue box should appear. Here click on the ‘Next’ button

Now, before you click on the ‘Build’ button, make sure to scan the results (it should be ‘Good’)
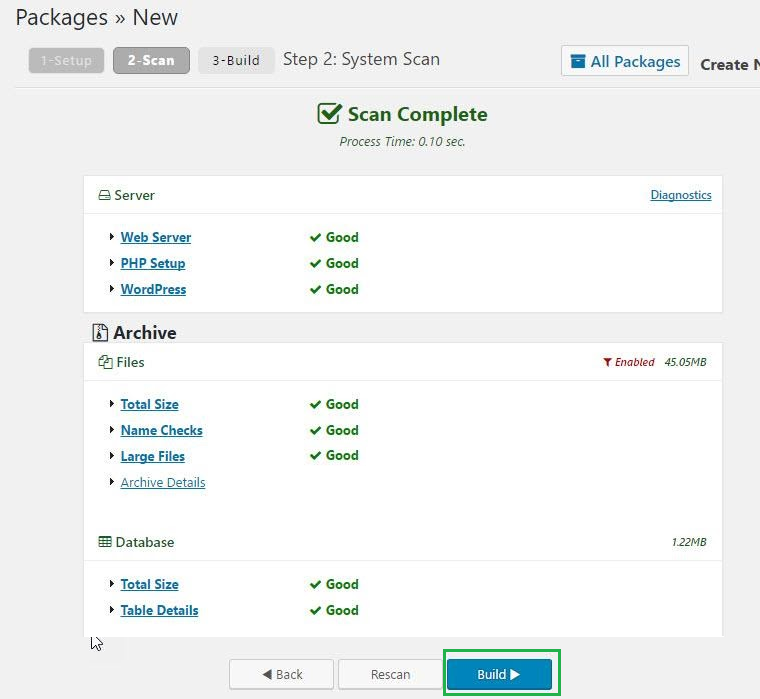
Note: This may take a while, make sure you do not close the tab.
After the process is completed, the following page should appear. Click on ‘One-click Download’. 
You’ve successfully downloaded the ‘Installer’ and ‘Archive’ files. The archive is a copy of your website whereas the installer file will automate the installation process.
Step 3: Import your WordPress website
After downloading the ‘Archive’ and ‘Installer’ files, it is time to transfer these files to the new web host.
You can use the FTP client (File Transfer Protocol) for this purpose – you can choose any FTP client you prefer. Some of the popular FTP clients are FileZilla, Cyberduck, WinSCP, Free FTP, etc.
- Enter the hostname and FTP/SFTP credentials of your server’s IP address as your domain name is still pointing to your previous web host. (You will find this information in your cPanel dashboard)
- Upload the Archive and installer.php to the root web folder (usually public_html) of your website
Note: Your root directory should be empty. If WordPress is pre-installed by your new web host, delete that before you proceed with the above steps.
Step 4: Modify the Hosts file on your local computer
Now that you have uploaded the aforementioned files to your new web host, it is time to execute the ‘installer.php’ file.
Usually, the installer.php file can be accessed by running the following in the URL in your browser:
https://www.domainname.com/installer.php
Should you access your installer.php file in such a manner you will most probably get a 404 error. This is a page not found error and you get it because your domain name still points to your old web host.
To rectify this error, you need to manually change your hosts file on your computer.
Note: If you decide to change your domain nameservers you may experience downtime. Modifying the ‘hosts’ file ensures that your website is also up and running with no downtime.
Steps to modify the Hosts file:
- Locate your new web hosting server’s IP address: You will find your IP address in your cPanel dashboard under ‘General Information’. ‘Shared IP Address’ is the IP address we are looking for
- If you’re using Windows OS: Start -> All Programs -> Accessories -> Right-click on Notepad and click ‘Run as Administrator’
- Click ‘Yes’ on the dialog box that appears
- After Notepad opens. Go to File -> Open -> Navigate to the following folder in the C drive
C:\Windows\System32\drivers\etc - You will find the ‘hosts’ file here. Select and open it
- Go to the end of your ‘hosts’ file and append the IP address you copied from cPanel along with your domain name 192.168.1.1 www.domainame.com
Note: If such a line already exists, replace it with the new data
- Save the changes.
Note: These changes are only temporary and the website on your new host can only be accessed from your computer. Thus, remember that once your migration process is completed (i.e after the 6th step <Run the Duplicator Migration Script>) you need to undo the above-mentioned changes in your ‘hosts’ file.
Step 5: Create a database on your new web host
Prior to running the installer on your new web host, make sure you have created a database in cPanel on your new web host. If yes, you can directly skip to step 6. If not, follow these procedures to create your database. We will be creating a MySQL database.
Creating the database:
- Login to your cPanel account
- Scroll till the database section and click on MySQL database

3. A new dialog box opens. Enter your database name and click ‘Create Database’
4. After the database is created, scroll down to the Users section and add a new user. Click on the ‘Create User’ button after entering the credentials.
5. Once the user is created, add the user to the Database you created by clicking on the ‘Add’ button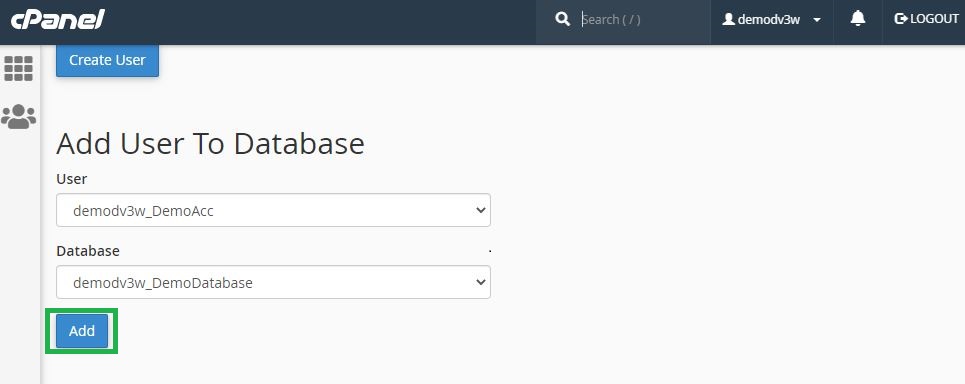
6. Manage permissions for the user and give them all the privileges 
7. Your database is ready to be used with WordPress
Step 6: Run the Duplicator website migration script
- Point your browser to https://www.domainname.com/installer.php. This will launch the Duplicator installer. Now click on ‘Next’ and keep moving

- Fill in the required information and click on ‘Next’. In the ‘host’ section mention ‘localhost’

- Now click on ‘Test Database’
- Assuming you were able to connect. Now click on ‘Next’

- The Duplicator plugin will now import your WordPress database from the downloaded archive zip to your newly created database